Quick Start
This quick start guide will help you set up Bindables and create your first bindings. It uses Unity UI (UGUI) as an example. For UI Toolkit, see UI Toolkit Docs.
Setup Bindable Settings
After installing the Bindables package, you'll need to setup your Bindable Settings. This will generate extension methods for Unity components that you can use to bind to your Bindable data.
Go to Tools > Bindables > Settings.
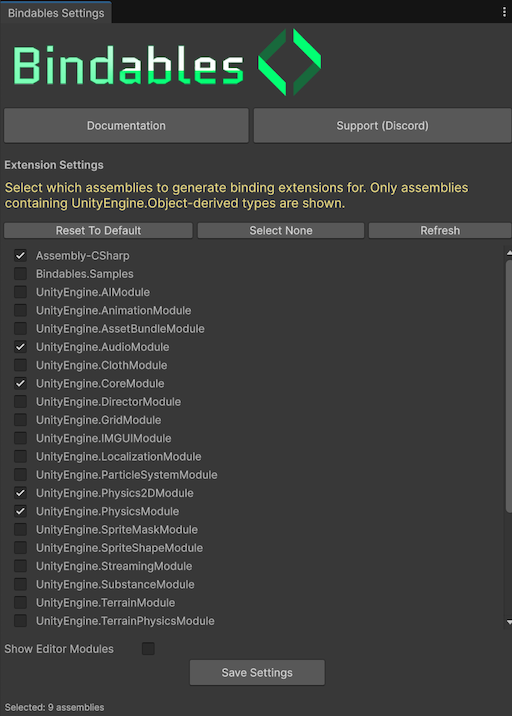
This menu controls which Unity objects will have Bind*() extension methods generated. For this guide, we need at minimum:
Unity.TextMeshProUnityEngine.UIUnityEngine.UIModule.
Click Save Settings.
Create Bindable Properties
Create a new script in your project and create this component.
using TMPro;
using UnityEngine;
using UnityEngine.UI;

public class TutorialBindings : MonoBehaviour
{
    [Header("UI Components")]
    [SerializeField]
    private Image _portrait;

    [SerializeField]
    private TextMeshProUGUI _title;

    [SerializeField]
    private Slider _healthBar;

    [SerializeField]
    private TextMeshProUGUI _healthText;

    [Header("Bindable Data")]
    [SerializeField]
    private Bindable<Sprite> _characterSprite;

    [SerializeField]
    private Bindable<string> _characterName;

    [SerializeField]
    private Bindable<float> _health;

    [SerializeField]
    private Bindable<float> _maxHealth;
}
The UI Components section holds references to UI that you will create in the editor.
The Bindable Data section contains Bindables to hold your data.
You can move the Bindables anywhere, like a different component, scriptable object, or a regular C# class. For now, we're just putting them in the same component for easy demonstration.
Create UI to Bind
Back to the editor, create some UI that looks something like this:
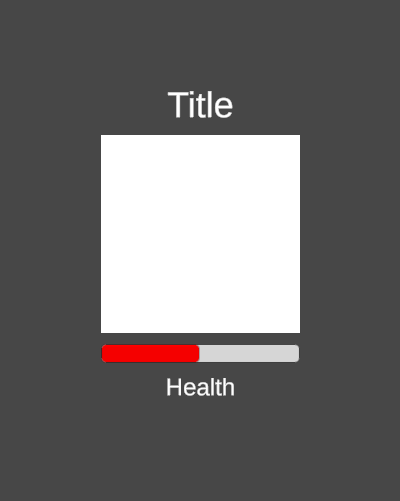
- Create a Canvas (
GameObject>UI>Canvas) - Create some title text (
GameObject>UI>Text - TextMeshPro) - Create an image (
GameObject>UI>Image) - Create a slider (
GameObject>UI>Slider)
Next, add your new TutorialBindings component somewhere in the scene and drag your new UI components into the Portrait, Title, Health Bar and Health Text fields.
You should also see the Bindable Data section in your component with the Bindable properties. Initialize the properties with some data.
Tip
You can find some sample sprites in Bindables package in the Samples > Sprites directory.
Create Bindings
If you play in editor, you'll see that nothing happens. That's because we need to write code to bind our UI components to the Bindable data. Let's do that now by adding a Start method.
    void Start()
    {
        _portrait.BindSprite(_characterSprite);

        _title.BindText(_characterName);

        _healthBar.BindValue(_health, _maxHealth,
            (health, maxHealth) => health / maxHealth);

        _healthText.BindText(_health, _maxHealth,
            (health, maxHealth) => $"Health: {health:0} / {maxHealth:0}");
    }
The first two bindings are pretty simple. They take whatever data is in the bindable and directly apply it to the Sprite and Text properties of the Image and TextMeshPro components.
The _healthBar and the _healthText bindings use the Derived feature of bindables. They combine the _health and _maxHealth bindables into a new derived value that can be applied to the health slider and text.
After adding this code, press play in the editor. You'll see that the UI gets updated with the data you set on your component.
When you change those Bindables in the inspector at truntime, you'll see that the UI updates instantly. This is the power of Bindables! You haven't written any update loops, property setters, or event handlers. With just a few lines in the Start method, your bindings are fully set up and will trigger as soon as the data changes.
What's Next?
Now that you know the basics, take a look at the other scenes in the Samples/Scenes directory of the package. Then, read these docs to learn more about how Bindables work and more advanced techniques.